Saturday, December 27, 2014

Happy Thanksgiving!!!???

WOW!  Am I behind on my blog postings or what?!


Well, I was having computer problems which are now solved thanks to our son (thanks, Doug).  I'm not a frequent poster to my blog but over the holidays, I typically make several cards and love to get them posted so here we go over the next few days.  

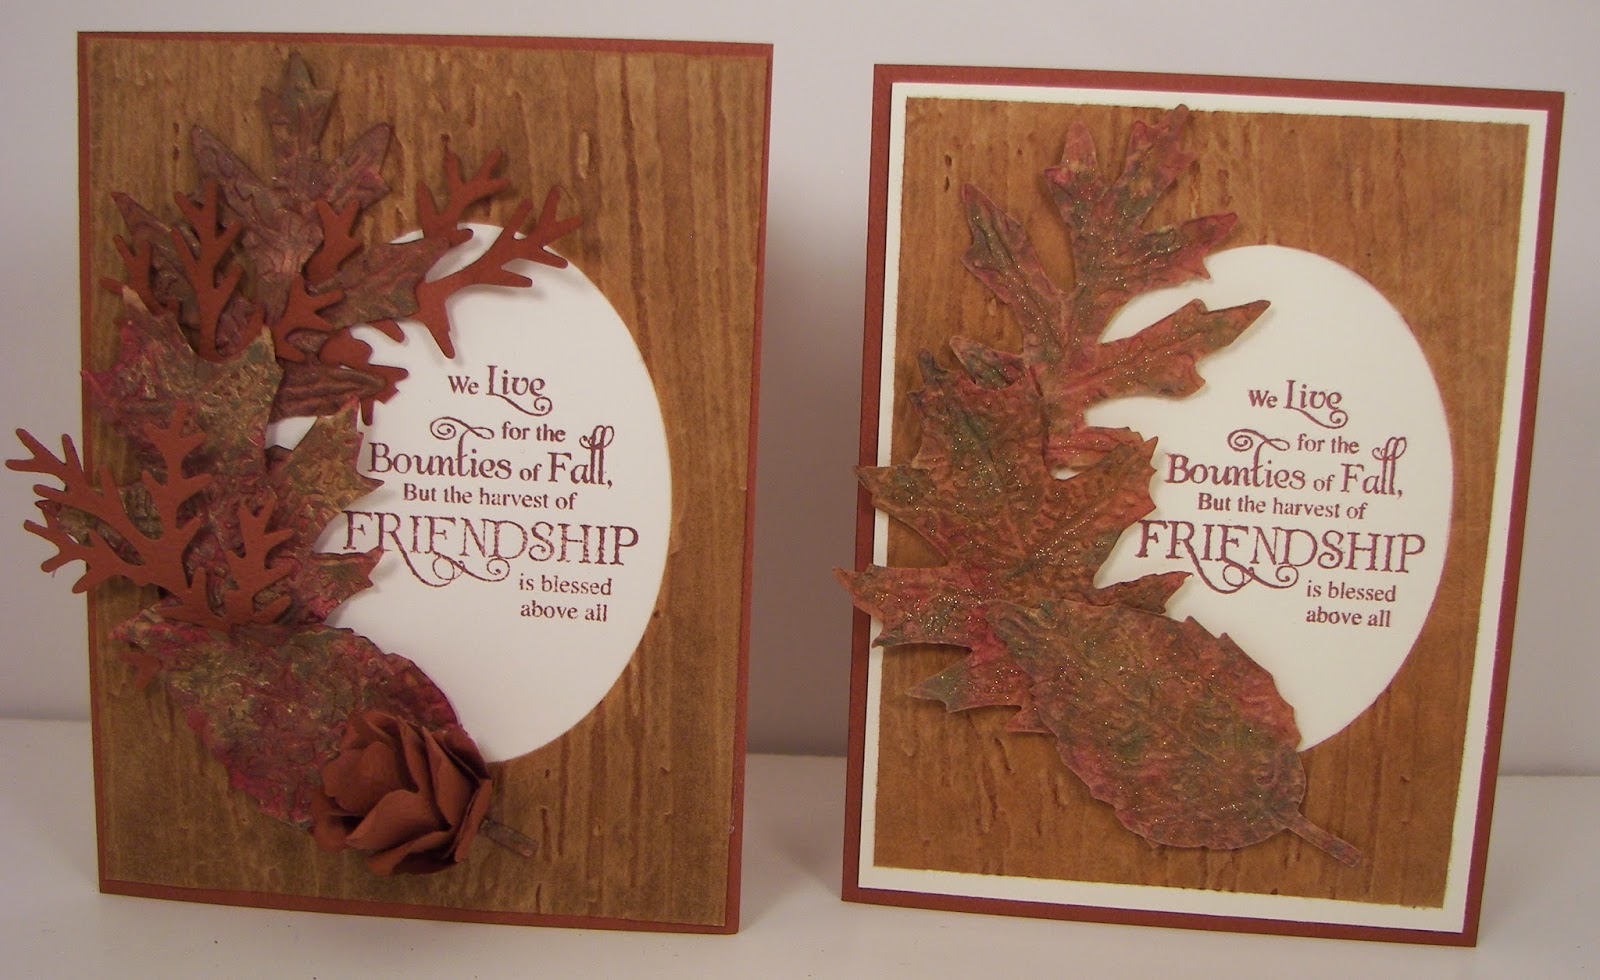
I created this card for some of my fellow stamping friends.  The Hero Arts stamp was colored directly on the stamp with Distress Markers and spritzed with water and stamped onto water color paper and then trimmed.  The rest is pretty self-explanatory.  Hope you had a great Thanksgiving that seems like it was a long time ago.  Oh wait, it was!:)

Tuesday, November 11, 2014

Stamp Club Challenge

Snowy day in North Central Wisconsin!  This card is so appropriate!


I created this card for our stamp club challenge last month.  The snowflake stamps are from Martha Stewart and the sentiment is a vintage stamp from Hero Arts.  I water colored with Distress Markers on water color paper after the images were embossed in white.  I outlined the panels with a silver pen and mounted onto speckled paper and then a 110# white card stock base.  


Thursday, November 6, 2014

Artistic Outpost and Stamp Club Challenge

I'm also sharing this card over on the Artistic Outpost blog for November's challenge of anything goes using Artistic Outpost stamps.  I love this stamp set and have several other AO stamp sets:)


I created this card for our November stamp club challenge using SU's crumb cake card stock throughout.  The background was created with the Falling Stars stencil from Memory Box and Dreamweaver's white stencil paste.  I stamped the images with Memento Tuxedo Black ink and then colored with chalk pencils.  The stars are die cuts from Spellbinders as is the banner tag.  I distressed all the edges with Vintage Photo Distress Ink.  The mirror stars are from Tim Holtz's line of vintage elements.  Will be adding this card to my Christmas card stash.


Thursday, October 30, 2014

Happy Halloween!

"Just hanging out with my ghoul friends"!  That was the sentiment  from Memory Box added to the inside of this card.


I created the background of this card with Bisters which are crystals and you dilute with water on watercolor paper.  You never know what you're going to get so just tons of fun to play with.  I used brown, green, blue and black Bisters on this card.  The main image is from Tim Holtz, Stampers Anonymous.  The Bisters can be purchased at I Brake For Stamps.  Have a great Halloween and around our part of the world - dress warm! 


Monday, October 27, 2014

Penny Black Stickers

I love Penny Black stickers but then again, I love Penny Black everything!


These cards are pretty much self-explanatory.  I used various Spellbinder's dies along with sentiments from Flourishes.  I added glitter to several of the flowers on the cards but, of course, that doesn't show up in the photo.  Very quick and simple and Penny Black does all the artwork for you!


Sunday, October 26, 2014

Sister's Birthday Card

The peacock stamp is from Stampin' Up and I believe new this year.  I created this card for my sister's birthday last month.


I like to research colors when coloring birds so looked up what a real peacock's coloring is like....not that I can even come close to replicating!  I colored the image using Copics.  I am still a novice at coloring with Copics and shading is a big issue for me.  Practice makes perfect so must keep practicing:)  The sentiment is from Endless Creations.  I love their sentiment fonts and styles.  

Saturday, October 25, 2014

October Shoe Box for Stamp Club

Haven't posted in forever on my blog!  Was a busy end of summer and then just let the fall get away from me but here is my project for stamp club this month.


This was a fun project to create.  I used Tim Holtz's Glassine Paper for the leaves and the embossed front piece.  The leaves are also Tim Holtz's line from Sizzix which includes the die and matching embossing folder.  The wood grain embossing folder is also from Sizzix.  Gold mixative and two other colors of alcohol inks were applied to a piece of glassine paper prior to die cutting and embossing.  Vintage Photo Distress Ink was applied to the wood grain embossed glassine piece and cut with an oval die.  The sentiment is from Just Rite.  The pine boughs and pine cone is also from Tim Holtz's Sizzix line shown on the left card.

Thursday, July 17, 2014

Memory Box Butterflies

I'm going to submit this card for our stamp club challenge for August.


These are the new Memory Box dies called Floating Butterflies along with the word die from MB.  The paper is called Remembrance from Authentique.  


Wednesday, July 16, 2014

Twinkling H20s

I haven't played with H20s in a long time!  This coloring medium is so pretty!


The stamp is from Penny Black and may be retired.  I painted various colors directly on the stamp and stamped on white card stock.  I also added splatters.  When dry, the image was cut with an oval die and mounted to SU's razzelberry berry paper.  The DP is also from SU to match the razzelberry which is a color release from a couple of years ago.   

Wednesday, June 25, 2014

Masculine Card

After cleaning up my craft room a few weeks ago, I've been attempting to use up creative bits and pieces and here's another.


Some time ago, I dry embossed this eagle on 40# vellum.  On the reverse side of the stamped image, you rub the "white" spaces of the image with any tool you have in your stash to create this effect.  The designer paper is from SU.  The embossing folder, from Sizzix, was used on Coordination's card stock and then sanded.  The tree die is from Tim Holtz.  Another fun technique with vellum and the remainder of the card is easy, peasy.

Tuesday, June 24, 2014

Tag Card

I created the tag some time ago and finally got around to doing something with it!  The tag was created using the packing tape transfer technique with a magazine picture and layered over a plain tag that was stamped with a crackle background stamp.


The black card base was embossed with one of Tim Holtz's texture fades and rubbed with gold paste.  I free-hand cut a heart from gold metal and manipulated it with metal-working tools.  I layered it with some Martha Stewart metal wings.  I hand-dyed the silk ribbon with Smooch spray.  Many fun techniques used all in one card.

Friday, June 20, 2014

July Stamp Club Challenge

Our challenge for July is appropriately red, white and blue along with the flag and some sparkle but no glitter.


I had fun creating this challenge using a tag as my canvas.  I sprayed the large tag with red Smooch and then distressed with Vintage Photo Distress Ink.  The stamps are from Tim Holtz.  I then used Memory Box's Starry Nights stencil over both corners and spread with white paste.  When dried, I added the Tim Holtz stars along with the Crafty Secrets ephemera also distressed with ink.  The tinsel is from Tim Holtz and the silk ribbon I colored myself with blue Smooch spray.  The Smooch sprays have some sparkle but do not show up in the photo.  A fun challenge to celebrate the 4th of July.

Monday, June 16, 2014

June Stamp Club Sketch Challenge

Margie provided our sketch challenge for this month and here's my take.


I used the Sizzix die set which cuts the entire card along with the circles and side pieces.  Always fun to see what everyone does with the monthly challenge.

Friday, June 13, 2014

June Shoe Box for Stamp Cub

My shoe box for June is an old stand-by technique which I have used many times in the past.


The main image is from Stampendous and the butterfly is from Impression Obsession.  Both images are stamped in Versamark and embossed with clear embossing powder onto white card stock.  Milled Lavender and Weathered Wood Distress Inks were blended over the images.  The word stamp is from Hero Arts and stamped in Memento London Fog.  Wipe off the image with a paper towel after the inks have been applied.  This technique can be used with just about any image or ink.

Tuesday, June 10, 2014

May Stamp Club Challenge

Just realized it has been a long, long time since I posted a project!  We were travelling late winter/early spring, then spring projects around the house and most importantly - cleaning out my craft room!  

It was my turn in May to provide the challenge for our club and it was to create an altered object.  I felt it was time to change it up a bit in our club challenges.


My friend, Pat, and I are not thrilled with the green tissue on the bodice but it was all I could find in my stash or even at the local craft stores for what I had in mind.  The gals in our group were very creative and came up with some awesome altered objects.  I should have received their permission to photograph them and post on my blog!  I have a few more things to share with you in the next few days and then I need to get creating in my "cleaned up" space!


Monday, March 31, 2014

Karen's Birthday

A very happy birthday to friend, Karen!  Today is a milestone birthday for her but won't say which one:)  May you have many more!


She loves feathers as I do, too.  Not sure what company these dies are from since I'm traveling and don't have the info in front of me!  The set also comes with a headband so you could create a feathered head dressing.  I cut the feathers from dupo paper which I purchased from Dick Blick.  I placed several drops of blue/green colored alcohol inks on a craft sheet and spritzed with alcohol blender solution then dipped the feather dies and let the solution move around until I was pleased with the look.  Let these dry completely.  Then I dipped the ends of the feathers in Versamark ink and embossed with gold embossing powder.

I took an art class using dupo paper and alcohol inks last fall and loved the things I learned!  Finally putting my new knowledge to use on paper.  Hope it's a beautiful spring day where you are!


Friday, February 14, 2014

Hearts to You

Here's a Valentine card I created for my stamping sister, Marie.


I die cut a heart with a Spellbinder's die from double sided sticky paper.  I then added red micro beads from Martha Stewart along with red glitter.  The same die was used to cut a heart from white card stock and the embellished heart was mounted behind the die cut opening.  I die cut a scalloped heart to mount on the top.  Have a great Valentine's Day!  

Thursday, February 13, 2014

Happy Valentine's Day!

This Valentine's card was created for friend, Karen, and I created similar Valentine's cards for my other stamping sisters - Barbara and Phyllis.


This card was created using red iridescent Shimmer Sheetz.  The Shimmer Sheetz was embossed with a 3D Embossability folder from Spellbinders.  I then lightly sanded the raised portions and swiped with black Staz-On ink.  The die is from Spellbinders Fancy Labels 2 set.  I also added some little red crystal hearts.  Have a great Valentine's Day!


Wednesday, February 5, 2014

Snowflakes

My friends and I attended a class at Stamp This...Scrap That in Minoqua, WI and we created a similar card using a die cut filigree heart.  I saw this Impression Obsession  intricate die (DIE093-X) at this store and it was a must-have.  


I have never worked with such a detailed die before but this was amazing.  Many different ways to use this die for sure.  I cut an A2 sized panel and die cut somewhat off the paper as shown.  Behind the panel, mount decorative paper or create your own background.  Then replace the die cut and adhere onto the negative space.  This die had an outer area that it cut which I removed.  Hard to explain but if you have, or purchase this die, you will see what I mean. I then embossed the panel with a snowflake embossing folder and mounted onto light gray card stock.  Added a snowflake brad to complete the card. 


Thursday, January 30, 2014

Envelope Full of Hearts

This card was created with several vintage items from my stash.  Sometimes fun to challenge yourself to dig deep and use some things that are long forgotten.  I have way too many of these items and I think it will be time to clean soon:)


Though I could have made my own envelope, I found these too cute vellum envelopes in a drawer full of odd-sized envelopes.  These worked perfect for what I had in mind.  I have four different PSX small heart stamps which I stamped in Versamark ink onto white card stock, embossed with gold and red embossing powders, cut out and taped into and on the envelope.  I distressed the designer paper and then distressed further with Fired Brick Distress Ink and also did the same to the vellum envelope.  This was all mounted to gold card stock and then a red card base.  Hard to believe that Valentine's Day is only a couple of weeks away but with the terrible winter weather we're experiencing, spring can't come soon enough!

Monday, January 27, 2014

Stencil Class

I've been participating in the Stencil Card Class by Jennifer McGuire and Kristin Werner the last four days.  Have definitely learned some new techniques along with fresh ideas on some older techniques.  I've only taken the time to create this one card so far for the class and I went off on my own by using my Copic air brush system (which is one of the best larger investments I've made in stamping).


I used a brand new stencil from Memory Box called Texture Shine.  I taped the stencil to 80# white card stock and layered several colors of orange and yellow Copic colors.  I removed the stencil and trimmed to fit.  I layered some coordinating card stock underneath and rounded the corners.  The stamp is also new from Verses Rubber Stamps.  I stamped it in black Memento ink onto 40# vellum, trimmed, rounded the corners and mounted with vellum tape.  Just added a few coordinating pearls and done.  Overall, a fairly simple card to create.  Look forward to trying paste on some of my new stencils.


Thursday, January 23, 2014

Fun with Shimmer Sheetz

I've been having fun playing with Shimmer Sheetz from Elizabeth Craft Designs.  I've had this product in my stash for some time and recently bought some new colors so have been playing around with different ink colors and techniques.


This Shimmer Sheetz is the red metallic (not the iridescent).  I added gold, green and orange alcohol inks onto the sheet with an ink applicator.  Once dry, I embossed it with an M-Bossability folder, sanded and then swiped black Staz-On ink across the raised portions.  

The butterfly sticker is also from Elizabeth Craft Designs.  I mounted it onto double stick tape and then applied warm white ultra-fine glitter and burnished.  The image was then colored with various Copic markers.  Hope to post more creations soon.

Sunday, January 19, 2014

Attempting to think Spring

Blogger changes!  Finally, got my cropped photos posted to my blog and in the future, will try to remember all the steps to make this happen!  Okay, enough venting.  We've already had a long winter here and several more weeks to go so trying to think warm with some spring/summer cards.


Both of these cards were created identically except for the designer paper and die.  Very clean and simple.  I took a 4-3/4" square of white card stock and placed my die where desired and cut AND embossed. This card stock could then be embossed with an embossing folder but now glad I didn't because the embossing of the outline of the die would not be visible.  


The dies are from Spellbinder's Wonderful Wings set.  This set has various sizes of dies with matching delicate dies and is one of my favorite go-to sets.  The designer papers are from Basic Grey and layered underneath the die cut on top of a 5" square white card.  The sentiment is from Endless Creations.